SpectraLayers Pro  6.0
Working with metadata

SpectraLayers Pro can read and edit metadata, markers, and regions.

Editing information

Choose Project > Information to display the Information dialog, where you can view and edit metadata information saved in the current sound file.


  1. Choose Project > Information. The Metadata dialog is displayed.
  2. Double-click a metadata value and type a new value in the box.
  3. Press Tab to commit your change and select the next metadata value.

Editing markers and regions

If you're editing a sound file that contains markers and regions, they will be shown in the spectral display.
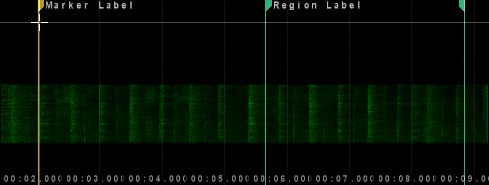
Choose Project > Markers to display the Markers and Regions dialog, where you can change marker and region positions, edit labels, delete markers, and add new markers and regions.

Note
Choose View > Markers and Regions to show or hide markers and regions in the spectral display.

Editing a marker or region

If you want to adjust markers and regions individually, you can drag the marker and region tags in the spectral display. For more detailed editing, choose Project > Markers and Regions to display the Markers and Regions dialog.

  1. Choose Project > Markers and Regions. The Markers and Regions dialog is displayed.
  2. Edit the Position value to change a marker or region's start time.
  3. Edit the Length value to change a region's length.
  4. Edit the text in the Description column to edit a marker or region's label.

    Note
    To rename a marker or region quickly, right-click (Windows) or control-click (Mac) the marker or region tag in the spectral display, and then choose Rename Marker/Region from the shortcut menu.
  5. Close the Markers and Regions dialog to update the spectral display with your changes.

Adding a marker or region

If you want to add a marker quickly, right-click the top of the spectral display and choose Add Marker from the shortcut menu.

If you want to add a region quickly, create a time selection, right-click (Windows) or control-click (Mac) the top of the spectral display and choose Add Region from the shortcut menu.

If you want to add multiple markers and regions with precise control over their position, choose Project > Markers and Regions to display the Markers and Regions dialog.

  1. Choose Project > Markers and Regions. The Markers and Regions dialog is displayed.
  2. Click the Add Marker button. A row is added to the marker list in the Markers and Regions dialog.
  3. Type a value in the Position value to set a marker or region's start time.
  4. Type a value in the Length value to set a region's length.
  5. Type a value in the Description column to set a marker or region's label.
  6. Close the Markers and Regions dialog to update the spectral display with your changes.

Deleting a marker or region

If you want to delete a marker or region quickly, right-click (Windows) or control-click (Mac) the marker tag at the top of the spectral display and choose Delete Marker/Region from the shortcut menu.

If you want to delete multiple markers and regions, choose Project > Markers and Regions to display the Markers and Regions dialog.

  1. Choose Project > Markers and Regions. The Markers and Regions dialog is displayed.
  2. Select a marker or region in the Markers and Regions dialog.
  3. Click the Delete Markers button.
  4. Close the Markers and Regions dialog to update the spectral display with your changes.