 |
SpectraLayers
6.0
|
|
|
SpectraLayers
6.0
|
|
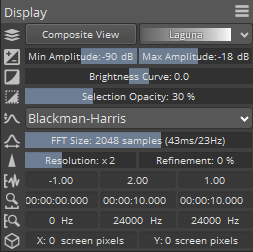
The Display panel controls the waveform and spectrogram settings. You can show or hide additional settings using the dropdown menu at the top right of the panel.
Choose View > Panels > Display to show or hide the Display panel.
The History panel allows you to see a list of the actions you've performed.
Choose View > Panels > History to show or hide the History panel.
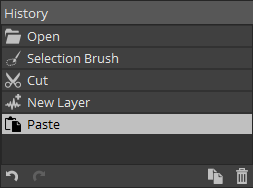
The last action is always displayed at the bottom of the list.
Click an action to step through your edit history and undo/redo actions.
The icons at the bottom of the panel allows you to undo, redo, duplicate the current state into a new project, and delete the selected action (and the followings).
The Channels Panel allows you to enable channels in multichannel audio files.
Choose View > Panels > Channels to show or hide the History Panel.
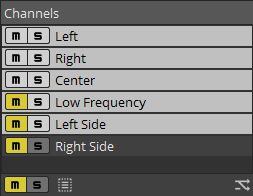
When you select a specific channel, only this channel can be modified.
If you want to exclude channels from playback, select the Mute button  . To unmute a channel, click the Mute button again to deselect it.
Click the Solo button  to mute all unsoloed channels. Click the Solo button on additional channels to add them to the solo group.
To remove a channel from the solo group, click its Solo button again.
The icons at the bottom of the panel allows you to select all channels, resample the project, and reinterpret the project.
The Layers panel allows you to manage the layers and layer groups in your project. You can mute/unmute or solo/unsolo layers, change phase, adjust volume, duplicate, delete, move, group and merge layers.
Choose View > Panels > Layers to show or hide the Layers panel
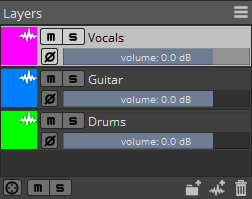
Click a layer or group to select it. To deselect a layer hold Ctrl (Windows) or Command (Mac) while clicking it.
A bold line in the overview bar represents the selected layer. For more information, see Waveform Display and overview bar
Click the color indicator to set the color that will be used to display a layer in the spectral display, waveform display and overview bar.
When working with layer groups, the group color is used for all the group's layers.
to prevent a layer or group from being played in the mix. Click the Mute button on additional layers or groups to add them to the mute group. to mute all unsoloed layers or groups. Click the Solo button on additional layers or groups to add them to the solo group. When you add a new layer, it's mixed with the other layers in your project.
Click the Phase button  to switch between additive and subtractive mode.
A dotted line in the overview bar represents a phase-inverted layer. For more information, see Waveform Display and overview bar
The file name is used for the layer name by default. Perform either of the following actions to edit a layer's name:
Drag a fader in the Layers panel to adjust a layer's volume in the global mix.
Layer groups help you to manage complex projects by grouping related layers. You can name, mute and solo, and expand/collapse layer groups. See also Grouping layers
Click the New Group button  at the bottom of the Layers panel to create a new group. You can then drag layers within the layers panel to add then to groups or move them among groups.
Click the New Layer button  at the bottom of the Layers panel to add a new, blank layer to your SpectraLayers project.
If no layers have been created in the current project, you'll be prompted to set the sample rate, channels, and length in the Create New Layer dialog.
Right-click (Windows) or Control-click (Mac) a layer and choose Duplicate from the shortcut menu. The new layer is added above the original layer in the Layers panel.
Right-click (Windows) or Control-click (Mac) a layer and choose Delete from the shortcut menu.
Drag layers in the Layers panel to rearrange them.
Right-click (Windows) or Control-click (Mac) a layer and choose Merge Down from the shortcut menu to merge the layer with the next layer in the list.
When a layer group is selected, choose Merge Group from the shortcut menu to merge the layers in the selected group to a single layer.
For more information, see Merging layers


