MediaBay
The MediaBay stores all Cubasis-related files such as projects, instruments, audio files, MIDI files, mixdowns and deleted files.
File list

The file list shows category, name, type, modification date and size of all files used in Cubasis. All files are automatically organized according to their extension (file type). The following directories are available:
-
 Audio: All "raw material" audio files are stored here, e.g. microphone recordings, audio drum loops and imported audio files. Supported formats are:
.wav,
.m4a,
.mp3,
.ogg and .flac.
Audio: All "raw material" audio files are stored here, e.g. microphone recordings, audio drum loops and imported audio files. Supported formats are:
.wav,
.m4a,
.mp3,
.ogg and .flac.
 MIDI: Contains all .mid files, including a wide range of MIDI drum loops.
Audio and MIDI content is split into two subfolders (Drum loops and My audio / MIDI files). Drag and drop a file into the arranger to place it, or double tap it.
Factory audio drum loops automatically match your song's tempo when imported into the project. Learn more about tempo matching here.
 Instruments: Tap an instrument to load and apply it to the selected instrument track.
If you have an audio (or no) track selected, a new instrument track will be created. Instruments are split into six groups: Audio Units, Inter-App, Classic Machines, Micro Sonic
(sampled), Micrologue (synthesizer) and MiniSampler (custom instruments).
Instruments: Tap an instrument to load and apply it to the selected instrument track.
If you have an audio (or no) track selected, a new instrument track will be created. Instruments are split into six groups: Audio Units, Inter-App, Classic Machines, Micro Sonic
(sampled), Micrologue (synthesizer) and MiniSampler (custom instruments). Projects: Cubasis refers to songs as projects. All your work is stored here, among a few project templates by Cubasis.
Double tap any project file to open it, tap a template to create a new project, or simply drag it into the arranger.
Note: A project consists of a folder which includes a .cbp file (Cubasis Project File)
and its associated wave and backup files. You can also open these files using Cubase on your desktop computer.
Projects: Cubasis refers to songs as projects. All your work is stored here, among a few project templates by Cubasis.
Double tap any project file to open it, tap a template to create a new project, or simply drag it into the arranger.
Note: A project consists of a folder which includes a .cbp file (Cubasis Project File)
and its associated wave and backup files. You can also open these files using Cubase on your desktop computer.
 Mixdown: A mixdown is a complete exported project, all of which are stored here.
You can simply re-import these files into your project if you wish, just like you would with files in the Audio or MIDI list.
Mixdown: A mixdown is a complete exported project, all of which are stored here.
You can simply re-import these files into your project if you wish, just like you would with files in the Audio or MIDI list.
-
 Trash: Deleting a file will move it to the trash folder. Double tapping a file in the trash folder
restores it to its appropriate location. Tap and hold the delete button to empty the trash.Note:
Deleting files in the trash folder will erase them from memory permanently; this process can not be undone.
Trash: Deleting a file will move it to the trash folder. Double tapping a file in the trash folder
restores it to its appropriate location. Tap and hold the delete button to empty the trash.Note:
Deleting files in the trash folder will erase them from memory permanently; this process can not be undone.
You can drag and drop files by tapping a file icon in the MediaBay or tap and hold a file anywhere in the file list.
- Delete files by dragging them into the trash folder or onto the Delete button.
- Drag project templates into the arranger to load them.
- Drag instruments onto a MIDI track to change its instrument.
- Drag audio or MIDI files into the arranger to place them into an existing or a new track.
- Drag a project into the Mixdown category to export it.
Tap the top of a column in the MediaBay browser to sort your files according to the desired attribute. Tap the
preview  button to listen to a file's content. Tap it again to stop the preview.
Tap the  icon to rename a file.
Mixdown
Choose the mixdown category and tap Create Mixdown.
The following file formats are available:
 WAV: Uncompressed Audio format, 16-bit, Stereo, 44kHz, high quality and file size
  M4A: Compressed Audio AAC format, lower quality and file size (handy for quick sharing over the internet)
 FLAC: Free Lossless Audio Codec, open source audio format with up to 60% lower file sizes than WAV.
- MIDI: Stores notes and project parameters only, no audio material. Can be opened with any scoring software or DAW. Although instruments are matched as closely to the General MIDI standard as possible, playback will differ on each system, depending on the instrument library used. MIDI files have a pitch bend range of +/- 2 semitones by default.
Note: Effect parameters are not included in MIDI files.
Note: The 4 mixdown options (mixdown between locators, include effect tail, separate files for tracks, normalize) are ignored for MIDI export.

Mixdown between locators limits the exported audio file to the area enclosed by the left and right locator.
Include effect tail is turned on by default. It includes the sound created by effects after the end of your song and extends it. Turning this off can be handy for creating loops (where the end seamlessly transitions into the beginning).
Create separate files for tracks can be useful for creating a library of sound effects, loops or other song elements.
Normalize performs a normalization to 0dB on the final product.
 Snapshot
Duplicates the selected file. Use Snapshot to create a version from your project in a specific state. You can always go back to that state by loading the snapshot. When loading a snapshot, a copy of the snapshot with a unique name is created automatically to ensure that a snapshot is not overwritten accidentally. Note: A newly created snapshot has no undo history.
 Import
The import button offers several options to import files into your project.
- AudioPaste: Allows to paste audio, which has been copied into the AudioCopy app, into the Audio directory.
- AudioShare: Allows to import audio files via the AudioShare app.
- iTunes: Allows you to import songs from your iTunes music library.
- Files: Allows you to import files from various locations (including iCloud Drive) via the Files app.
Note: Imported files will be placed into corresponding folders, according to their file type.
Note: You can import files (all supported formats) directly from the Dropbox app. Simply hit the ... icon in the file viewer and select Export. From the list of available apps, choose Cubasis.
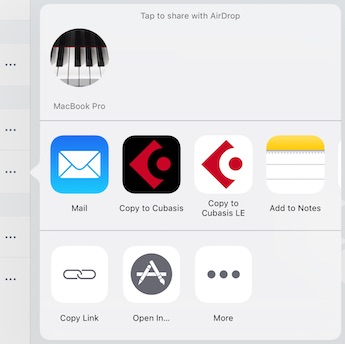
 Share
Share
There are multiple options for sharing/exporting files.
- Email*
- AudioCopy Allows to copy audio into the AudioCopy app. Tap Copy, select the app on your device you want to copy the file into and hit Done (or directly launch the app from the list).
- AudioShare Allows to export audio files to the AudioShare app.
- SoundCloud Allows to export audio files to SoundCloud*.
ZIP Compresses your project into a .zip file containing the .cpb (Cubasis Project) and all associated audio material. The .zip folder is placed in the Shared Projects directory and ready to be transferred to your computer via the Files App, the WiFi Server or iTunes File Sharing.
- More: Includes AirDrop, Files App and other apps installed on your device such as Dropbox*.
* Wireless connection required, WiFi recommended.
Export to External Hard Drives
Cubasis projects can be saved to iOS-compatible hard drives, allowing to backup and transfer your work with just a few simple steps:
- Select a project.
- Tap the Share button.
- Choose Open With.
- Select the hard drive companion app. The project including its audio material will be saved to the external hard drive.
Export to Cubase
To open a Cubasis project in Cubase, follow these steps:
- Share your project via the ZIP option and transfer it to your computer via AirDrop, Files App or iTunes File Sharing
- The project arrives as a .zip file, containing a .cpb (Cubasis Project) file and all audio files used in the project.
- Make sure that the Cubasis Importer (a free Cubase extension) is installed on your computer.
- Unzip the file and launch Cubase.
- In the Cubase menu, go to File -> Import -> Cubasis.
- A file browser dialog will appear. Select the .cpb file.
 Delete
Moves the selected file to the Trash directory. Deleting files in the Trash directory will permanently erase them from memory; this process cannot be undone.
Files App
To further use, transfer and share Cubasis files with your device, the Files app introduced in iOS 11 is a good choice.
Any file within the Cubasis system can be viewed, deleted and shared intuitively.
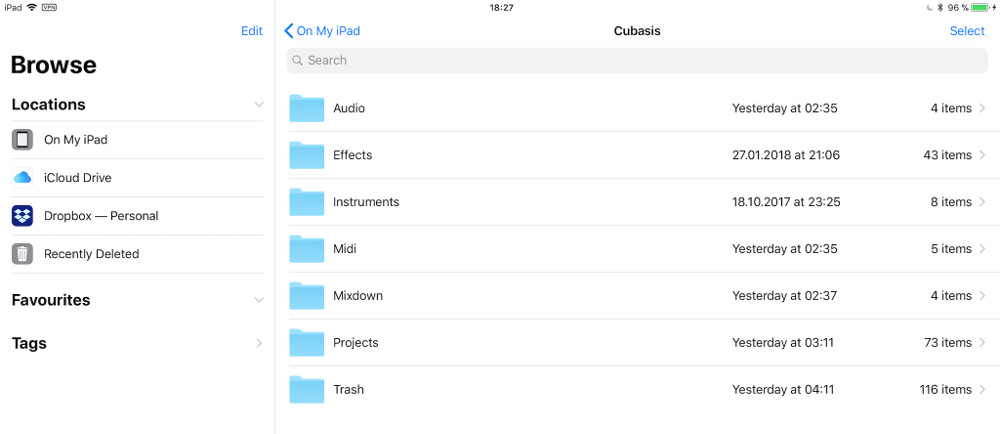 Note: Be careful when deleting files, as the app allows you to dive quite deeply into the Cubasis folder structure. Deleting, moving or renaming certain files may impair Cubasis functionality.
WiFi Server

Using the WiFi server is another option for transferring files between your computer and Cubasis. As opposed to iTunes File Sharing, this method allows you to access the MediaBay's categories directly.
Follow these steps to set up the server:
- Connect to a WiFi network in your iPad's settings.
- Connect to the same network with your computer.
- Go to the Setup menu and enable the WiFi Server. When switched on, it displays an IP address (such as 10.0.2.8:8080).
- Enter the IP address into the address bar of your Computer's web browser.
- To save a file to your computer's hard drive, click it (or right click it and choose your browser's download or save option).
To import files from your Computer to the Cubasis MediaBay, select Browse, choose the desired files from your hard drive and click Import to copy all supported files onto your iPad. Zip files are extracted automatically.
Note: In order for Cubasis to recognize imported files, you need to remain at the top folder level (as shown in the above image).iTunes File Sharing
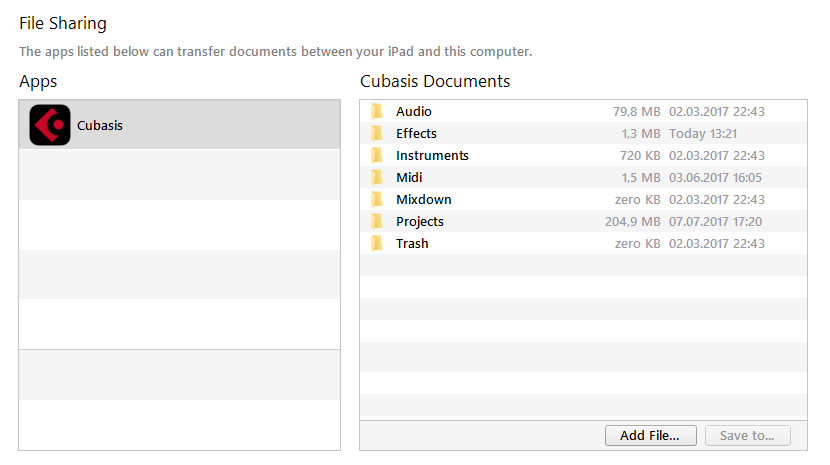
iTunes file sharing is the simplest method for transferring files from and to your computer without a wireless connection. We recommend to back up your files this way on a regular basis.
Follow these steps to access the MediaBay from your computer:
- Connect your iPad to your computer with the USB cable.
- Open iTunes and select your iPad in the DEVICES category.
- Click the Apps tab and choose Cubasis in the list of apps that support File Sharing (below the Sync Apps list). The MediaBay directories will be displayed in the right list.
- Drag and drop a file into the list or use the Add button to import a file into the MediaBay. The files are sorted into the appropriate directories automatically.
- To save a folder to your computer, select it and hit the Save to button. Alternatively, drag and drop it to your desktop or local browser (e.g. Explorer, Finder).
Supported file formats
Cubasis supports the following extensions:
- .cbp
- .zip
- .mid
- .midi
- .wav
- .mp3
- .m4a
- .ogg
- .flac
- .cbi
- .vstpreset
- .preset