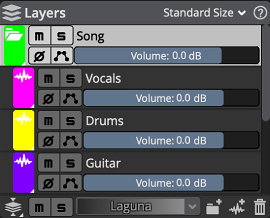
Manage layers. The layer size at the top (Standard Size or Compact Size) controls the layout of the panel.
The ![]() Mute buttons and
Mute buttons and ![]() Solo buttons allows you to mute or solo specific layers.
Solo buttons allows you to mute or solo specific layers.
![[Note]](skin/admon/note.png) |
Note |
|---|---|
|
When a layer is muted, it becomes invisible in the waveform and spectral display. When a layer is soloed, non-soloed layers becomes invisibles in the waveform and spectral display. |
![[Tip]](skin/admon/tip.png) |
Tip |
|---|---|
|
You can mute or solo a single layer regardless of all other layers state by pressing Ctrl (Windows) Cmd (macOS) while clicking the Mute or Solo button. To clear mute and solo states on all layers, click the Mute and Solo buttons at the bottom of the panel. |
The ![]() Polarity buttons invert the polarity of the audio content.
When two layers share identical content, but are opposed in polarity, this shared contents gets cancelled in the final mix.
Polarity buttons invert the polarity of the audio content.
When two layers share identical content, but are opposed in polarity, this shared contents gets cancelled in the final mix.
The ![]() Envelope buttons creates a volume envelope that can be edited in the waveform display. Deactivating this button disable the envelope,
by does not destroy it. It can be enabled again by clicking on the button again.
Envelope buttons creates a volume envelope that can be edited in the waveform display. Deactivating this button disable the envelope,
by does not destroy it. It can be enabled again by clicking on the button again.
|
Note |
|---|---|
|
You can edit the envelope for a specific channel by selecting that specific channel in the Channels Panel first. |
The Volume sliders let you adjust precisely the volume of each layer.
Selected layers are highlighted in white. When a layers is selected, you can perform edits on it. When multiple layers are selected, you can performs grouped actions such as group, merge, delete, export… See Layers Management and Importing and Exporting Layers.
You can rearrange layers by drag and dropping them within the Layers Panel.
![]() Composite Layers View: (shortcut: C) When activated, all layers are summed into a single color-mapped view. The Composite Layers View Color Mapping selector exposes different color maps that can be chosen from.
Composite Layers View: (shortcut: C) When activated, all layers are summed into a single color-mapped view. The Composite Layers View Color Mapping selector exposes different color maps that can be chosen from.
![]() Selected Layers View: (shortcut: S) When activated, only the selected layers are rendered in full colors, while unselected layers are dimmed. The Selected Layers View Color Dimming slider defines how much dimming is applied (from full color, to gray, to black).
Selected Layers View: (shortcut: S) When activated, only the selected layers are rendered in full colors, while unselected layers are dimmed. The Selected Layers View Color Dimming slider defines how much dimming is applied (from full color, to gray, to black).
|
Note |
|---|---|
|
You can switch between Composite Layers View and Selected Layers View using the mouse wheel over the icon, or by pressing C and S. |
You can create new layers by clicking the ![]() New Layer button.
This is equivalent to clicking › or pressing Ctrl+Shift+N (Windows) Cmd+Shift+N (macOS).
New Layer button.
This is equivalent to clicking › or pressing Ctrl+Shift+N (Windows) Cmd+Shift+N (macOS).
You can create new groups by clicking the ![]() New Group button.
This is equivalent to clicking › .
Groups can contain multiple layers. To add existing layers to a group, you can drag layers inside that group. When a group
is closed, instead of displaying each layer individually within that group SpectraLayers Pro will show the mix of all its
layer with the color of that group.
New Group button.
This is equivalent to clicking › .
Groups can contain multiple layers. To add existing layers to a group, you can drag layers inside that group. When a group
is closed, instead of displaying each layer individually within that group SpectraLayers Pro will show the mix of all its
layer with the color of that group.
You can delete selected layers or groups by clicking the ![]() Delete Layer or Delete Group button.
Delete Layer or Delete Group button.
|
Note |
|---|---|
|
You can’t delete an external layer or group, such as layers or groups created by an external host DAW when SpectraLayers Pro is used in ARA mode. |
