MediaBay
The MediaBay stores all Cubasis-related files such as projects, instruments, audio files, MIDI files, mixdowns and deleted files.
Hub
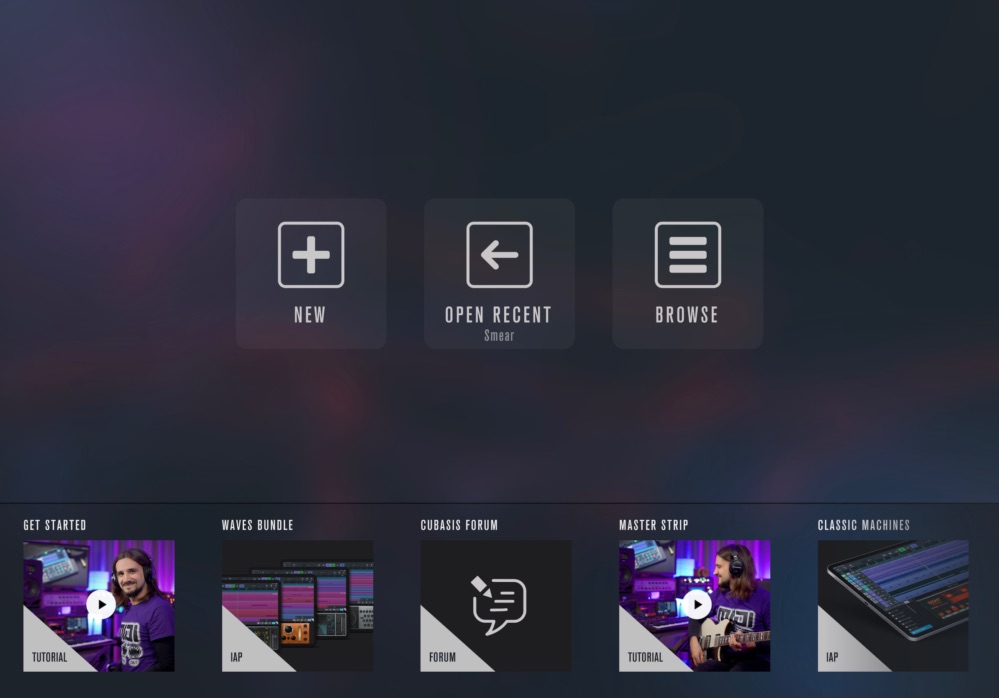
When you launch Cubasis, the Hub assists you with organizing your projects and provides additional information about tutorials and more.
It allows you to create a new project, open the project you have previously been working on, and to open the MediaBay to browse all projects.
The Hub’s lower zone displays useful information such as links to free content, available tutorials, interesting deals and much more.
It can be toggled via the arrow on the right.
When a project is open, you can return to the Hub by opening the MediaBay and tapping “Hub”, which is the topmost entry in the folder list.
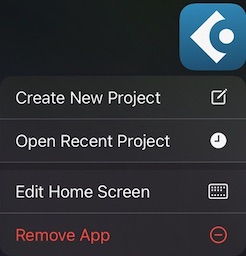
Home Screen Quick Actions
There is a way to bypass the Hub and directly load a new or your previous project. Touch and hold the Cubasis app icon on the home screen to immediately create a new project or open a recent project via tapping the corresponding menu entries.
File list
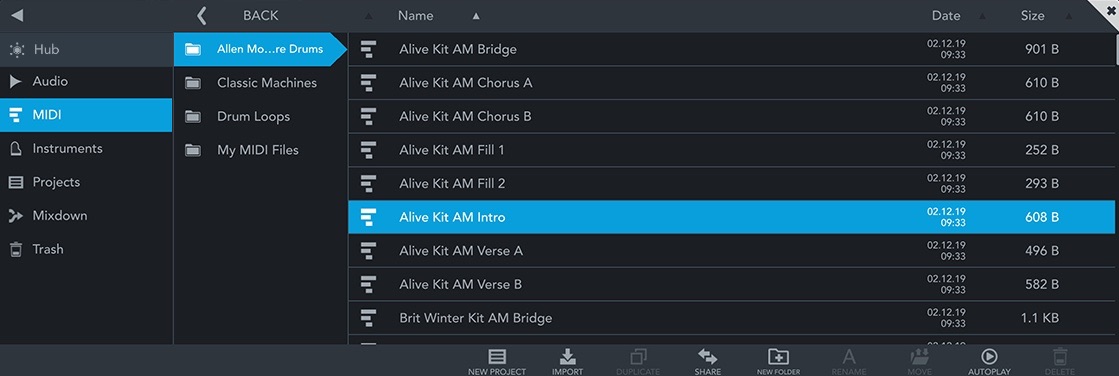
The file list shows category, name, type, modification date and size of all files used in Cubasis. All files are automatically organized according to their extension (file type). The following directories are available:
-
 Audio: All "raw material" audio files are stored here, e.g. microphone recordings, audio drum loops and imported audio files. Supported formats are:
.wav,
.m4a,
.mp3,
.ogg and .flac.
Audio: All "raw material" audio files are stored here, e.g. microphone recordings, audio drum loops and imported audio files. Supported formats are:
.wav,
.m4a,
.mp3,
.ogg and .flac.
 MIDI: Contains all .mid files, including a wide range of MIDI drum loops.
Audio and MIDI content is split into two subfolders (Drum loops and My audio / MIDI files). Drag and drop a file into the arranger to place it, or double tap it.
Factory audio drum loops automatically match your song's tempo when imported into the project. Learn more about tempo matching here.
 Instruments: Tap an instrument preset to load and apply it to the selected MIDI track. If you have an audio (or no) track selected, a new instrument track will be created.
 Projects: Cubasis refers to songs as projects. All your work is stored here, among a few project templates by Cubasis.
Double tap any project file to open it, tap a template to create a new project, or simply drag it into the arranger.
Note: A project consists of a folder which includes a .cbp file (Cubasis Project File)
and its associated wave and backup files. You can also open these files using Cubase on your desktop computer.
Projects: Cubasis refers to songs as projects. All your work is stored here, among a few project templates by Cubasis.
Double tap any project file to open it, tap a template to create a new project, or simply drag it into the arranger.
Note: A project consists of a folder which includes a .cbp file (Cubasis Project File)
and its associated wave and backup files. You can also open these files using Cubase on your desktop computer.
 Mixdown: A mixdown is a complete exported project, all of which are stored here.
You can simply re-import these files into your project if you wish, just like you would with files in the Audio or MIDI list.
Mixdown: A mixdown is a complete exported project, all of which are stored here.
You can simply re-import these files into your project if you wish, just like you would with files in the Audio or MIDI list.
-
 Trash: Deleting a file will move it to the trash folder. Double tapping a file in the trash folder
restores it to its appropriate location. Tap and hold the delete button to empty the trash.Note:
Deleting files in the trash folder will erase them from memory permanently; this process can not be undone.
Trash: Deleting a file will move it to the trash folder. Double tapping a file in the trash folder
restores it to its appropriate location. Tap and hold the delete button to empty the trash.Note:
Deleting files in the trash folder will erase them from memory permanently; this process can not be undone.
You can drag and drop files by tapping and dragging a file icon in the MediaBay or tapping and holding a file anywhere in the file list.
- Delete files by dragging them into the trash folder or onto the Delete button.
- Drag projects into the Templates folder to convert them to templates.
- Drag audio or MIDI files into the arranger to place them into an existing or a new track.
- Drag any file into another folder or sub folder to move it.
- On iOS, you can drag a file from any other app (like the Files app) into the MediaBay or onto a track (provided that the file format is compatible).
Tap the top of a column in the MediaBay browser to sort your files according to the desired attribute.
Supported file formats
Cubasis supports files with the following extensions:
- .cbp (Cubasis Project)
- .zip
- .mid
- .midi
- .wav
- .mp3
- .m4a
- .aif / .aiff
- .ogg
- .flac
- .cbi (MiniSampler instrument preset)
- .vstpreset (Micrologue preset)
- .preset (Effect or AU preset)
- .cml (MIDI Learn preset)
Mixdown
Choose the mixdown category and tap Create Mixdown to render and export your project to another file type. The following file formats are available:
- WAV: Uncompressed audio format, high quality and file size.
- AIFF: Audio Interchange File Format, uncompressed audio format with high quality and file size.
- FLAC: Free Lossless Audio Codec, open source audio format with up to 60% lower file sizes than WAV.
- M4A: Compressed audio AAC format, lower quality and file size.
- MP3: Popular compressed audio format, lower quality and file size. Limited to 44.1 and 48 kHz.
- MIDI: Stores notes and project parameters only, no audio material. Can be opened with any scoring software or DAW. Although instruments are matched as closely to the General MIDI standard as possible, playback will differ on each system, depending on the instrument library used. MIDI files have a pitch bend range of +/- 2 semitones by default. Note: Effect parameters are not included in MIDI files. Note: The 5 mixdown options (mixdown between locators, include effect tail, separate files for tracks, dry, normalize) are ignored for MIDI export.
The following options are available:
- Mixdown between locators limits the exported audio file to the area enclosed by the left and right locator.
- Include effect tail is turned on by default. It includes the sound created by effects after the end of your song and extends it. Turning this off can be handy for creating loops (where the end seamlessly transitions into the beginning).
- Create separate files for tracks creates so-called Stems, a separate audio file for each track that is not muted. Not available for MIDI.
- Exclude all effects (dry) disables all insert, send and master insert effects during mixdown.
- Normalize performs a normalization to 0dB on the final product.
- Mono downmix creates a mono file, instead of stereo.
 New Project
Tap this button to create a new Cubasis project.
 Duplicate
Tap this button to create a duplicate of a file.
 Import
On iOS, the import button offers several options to import files into the MediaBay:
- AudioShare: Allows to import audio files via the AudioShare app.
- Apple Music: Allows you to import songs from your Apple Music library. Note that only songs that have been purchased in the iTunes Store can be imported, not any song that is available for streaming via Apple Music.
- Files: Allows you to import files from various locations (including iCloud Drive) via the Files app.
On Android, a file import dialog opens, that allows you to select multiple files (via long tap) to import. Selecting folders is not possible.
Note: Imported files will be placed into corresponding folders, according to their file type.
Note: You can import files (all supported formats) directly from the Dropbox app. Simply hit the ... icon in the file viewer and select Export. From the list of available apps, choose Cubasis 3.
 Share
Share
There are multiple options for sharing or exporting files. WiFi connection is recommended.
On Android, the default Android share dialog appears, giving you a multitude of options like Android Beam, other apps, Google Drive and more, depending on what other apps you have installed.
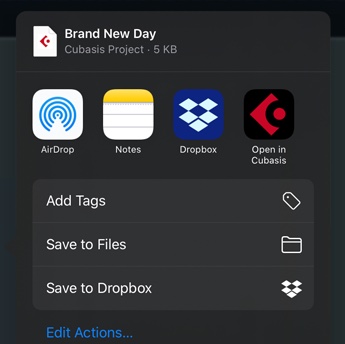
On iOS, a popup offers 3 options:
- AudioShare Allows to export audio files to the AudioShare app.
More: The default iOS share dialog offers a multitude of options such as AirDrop, Files App and other apps installed on your device such as Dropbox or Google Drive.
Projects that contain audio files are compressed into a .zip file containing the .cpb (Cubasis Project) and all of its wav files.
 New Folder
Tap this button to create a new folder.
 Rename
Allows to rename files or folders.
 Move
Move
Select a file or a folder, then tap the Move button to start the move mode. The selected item turns violet and the move button starts to blink. Navigate to the destination folder and tap the Move button again to move the file or folder there. Press the cancel button to terminate the operation.
 Autoplay
Enable this button to playback available audio previews.
 Delete
Moves the selected file to the Trash folder.
Deleting files in the Trash will permanently erase them from memory; this process cannot be undone.
Double tapping a file in the trash, or dragging and dropping it into another folder, restores it.
Export to External Hard Drives
Cubasis can save files onto an external hard drive that is supported by your device, allowing to backup and transfer your work with just a few simple steps:
- Select a project or file.
- Tap the Share button.
- Select the hard drive companion app. The project including its audio material will be saved to the external hard drive.
Export to Cubase
To open a Cubasis project in Cubase, follow these steps:
- Share your project via the ZIP option and transfer it to your computer via AirDrop, Files App or iTunes File Sharing
- The project arrives as a .zip file, containing a .cpb (Cubasis Project) file and all audio files used in the project.
- Make sure that the Cubasis Importer (a free Cubase extension) is installed on your computer.
- Unzip the file and launch Cubase.
- In the Cubase menu, go to File -> Import -> Cubasis.
- A file browser dialog will appear. Select the .cpb file.
Direct access to the Cubasis directory
Instead of using the MediaBay’s Import and Share button, files can be copied to and from the MediaBay by copying them to and from the Cubasis 3 directory directly. This can be handy for backup purposes (e.g. to copy the whole Cubasis 3 directory to a thumb drive), or for importing or exporting a large number of files or whole directories. The MediaBay in Cubasis is a 1:1 representation of the Cubasis 3 directory. The procedure is a bit different on iOS and Android but it works on both platforms.
Note: Any file that you place directly in the Cubasis 3 directory will be processed and sorted into the right sub folder automatically, provided that the file format is supported by Cubasis. For example, if you place a zip file that contains a project in the Cubasis 3 directory, Cubasis will (at the next launch or after a few seconds) unzip the file and place the project in the Projects sub folder.
Note: Be careful when deleting files from the Cubasis 3 directory from a file manager app, they cannot be retrieved anymore. Only files deleted via the MediaBay’s Delete button in Cubasis will go to the Trash first.
Important: If you delete Cubasis from your device, iOS and Android will also delete all the files in the MediaBay (your projects, audio and MIDI files, instruments etc.), so don’t forget to backup your Cubasis data regularly. On Android 10 and later, a popup will give you the option to “Keep app data” (recommended).

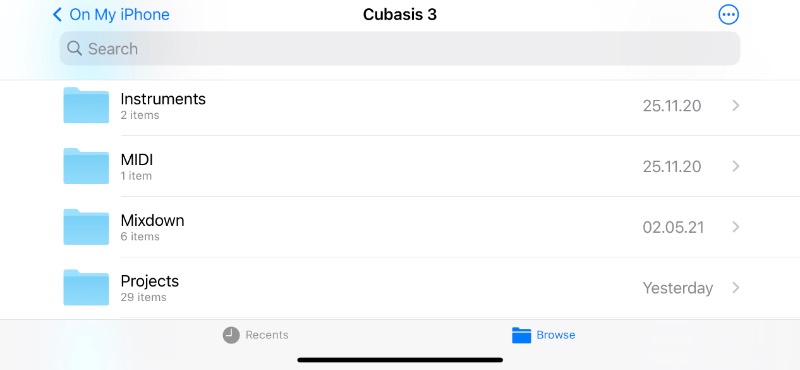
Access through the iOS Files app 
Launch the Files app from your iOS home screen, tap Browse (not Recents), then go to “On My iPad” (or “On My iPhone”) and Cubasis 3. In addition to moving, copying and sharing files, the Files app can even zip file and folders (long tap, then tap Compress).
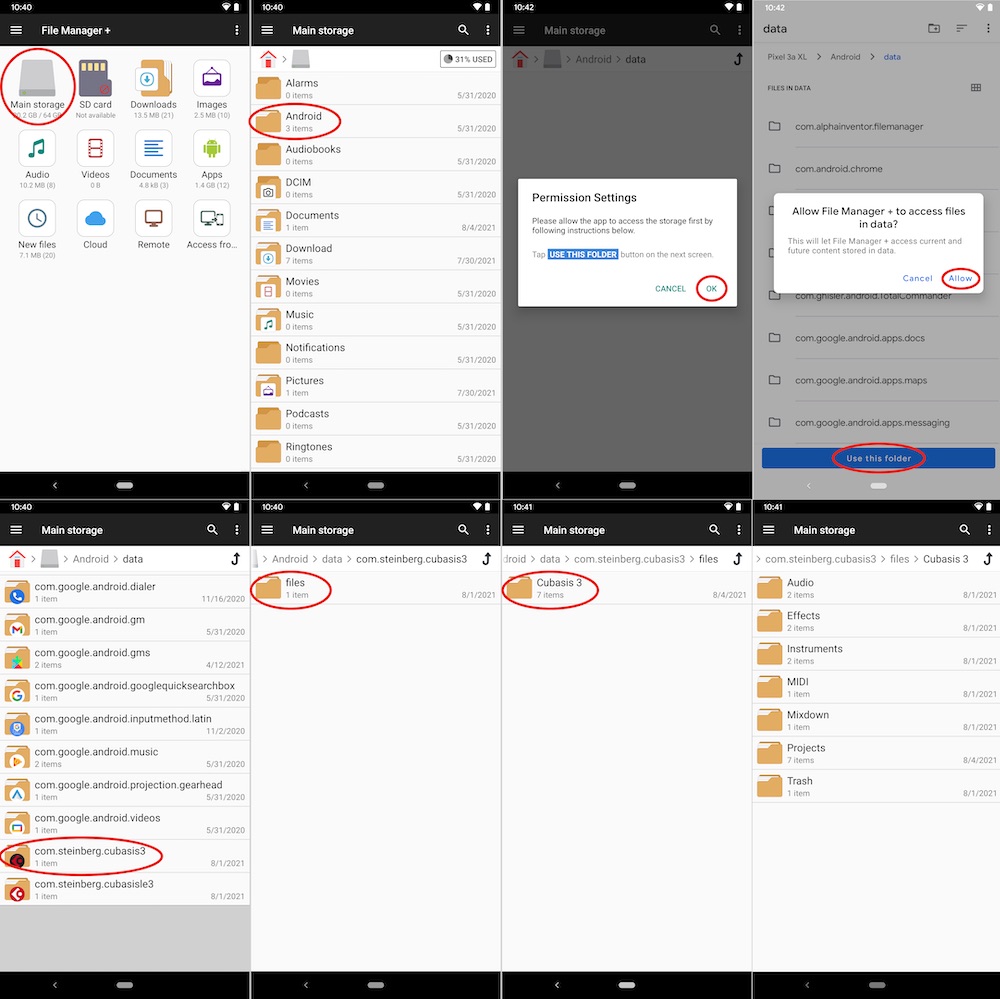
Access through an Android file manager 
Android’s native Files app cannot access the Cubasis 3 directory, but some free file manager apps from the Play Store can, such as Files by Marc apps & software. The location of the directory can vary slightly depending on the device manufacturer, but it’s basically:
/Android/data/com.steinberg.cubasis3/files/Cubasis 3
In some apps, the base Android folder is located in a “Main storage” or “Internal shared storage” folder, or in “storage/emulated/0” in others. When you access the data folder for the first time, the file manager will probably ask your permission to access this protected system folder.
The following series of screenshots illustrates the process using the File Manager Plus app, which works up until Android 13. For Android 14 and later, we recommend the app Files by Marc apps & software.
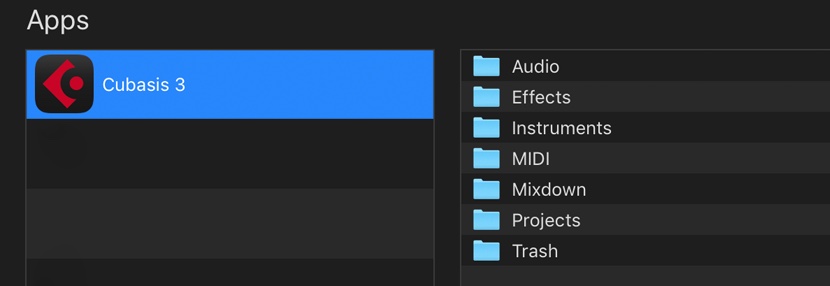
Access through the macOS Finder
Follow these steps to access the MediaBay from your Mac:
- Connect your iOS device to your Mac with the USB cable.
- On the Mac, open a Finder window, go to Locations and tap your iOS device.
- Click the Files tab and click Cubasis 3 in the list of apps. The MediaBay directories will be displayed in the list on the right.
- Drag and drop a file from another Finder window into the list to import it into the MediaBay.
- To save a folder to your Mac, drag and drop it to its target location into another Finder window.

Access through iTunes File Sharing
Follow these steps to access the MediaBay from your Windows PC:
- Connect your iOS device to your computer with the USB cable.
- Open iTunes and select your iOS device in the Devices category.
- Click the Apps tab and choose Cubasis 3 in the list of apps. The MediaBay directories will be displayed in the list on the right.
- Drag and drop a file into the list or use the Add button to import a file into the MediaBay.
- To save a folder to your computer, select it and hit the Save to button. Alternatively, drag and drop it to your desktop or into a Windows Explorer window.
Android storage location
On Android, Cubasis stores its files in an app-specific directory which is only accessible by Cubasis and certain file manager apps from the Play Store. It cannot be accessed by the Android Files app.
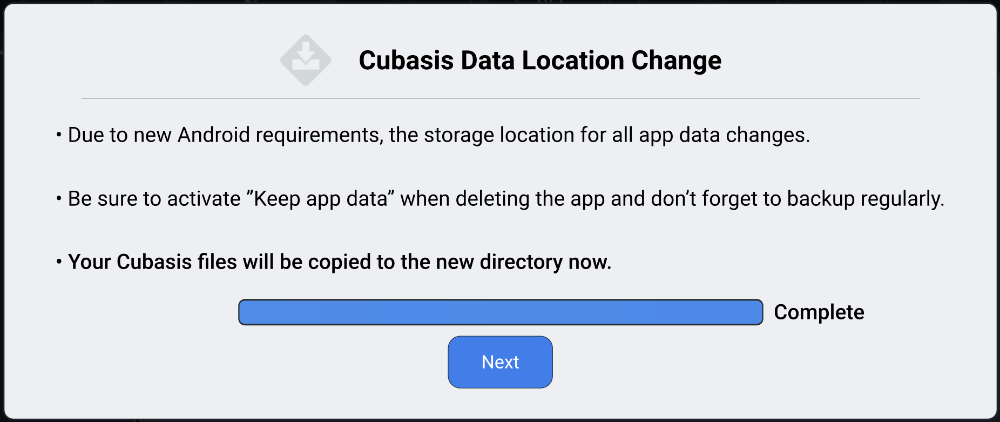
This new storage location was introduced with Cubasis 3.3.2 to comply with Google’s mandatory new storage requirements. When updating from an earlier Cubasis version to Cubasis 3.3.2 or later, a dialog guides you through the process of copying the MediaBay data from the old to the new storage location, i.e. from the legacy Cubasis 3 folder to the new app-specific directory.
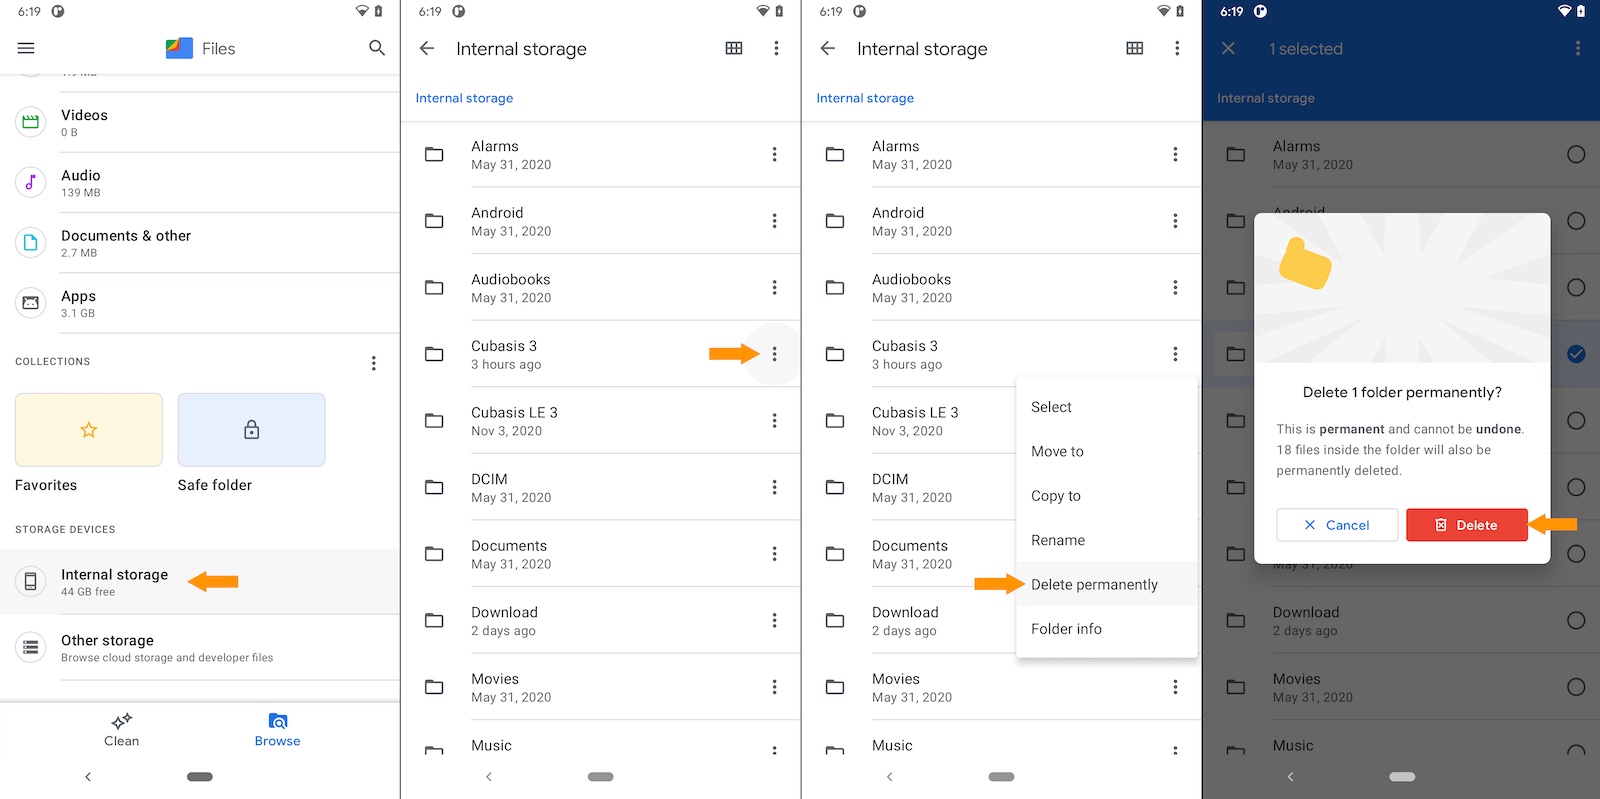
After this process is completed successfully and you see all your files in the MediaBay, we recommend that you delete the old Cubasis 3 folder using a file manager app, unless you want to keep it as a backup. The legacy “Cubasis 3” folder is no longer accessed by Cubasis 3, which means that placing a file inside it will no longer make it appear in the MediaBay. Instead, use the Import button to copy files from an external location into the MediaBay. To delete the Cubasis 3 folder using the Android Files app, scroll down to “Internal storage”, tap the dots next to “Cubasis 3”, then tap Delete. The exact wording and layout may vary depending on the device manufacturer. The following sequence of screenshots illustrates the process in the Files app on an Android 11 Google device:
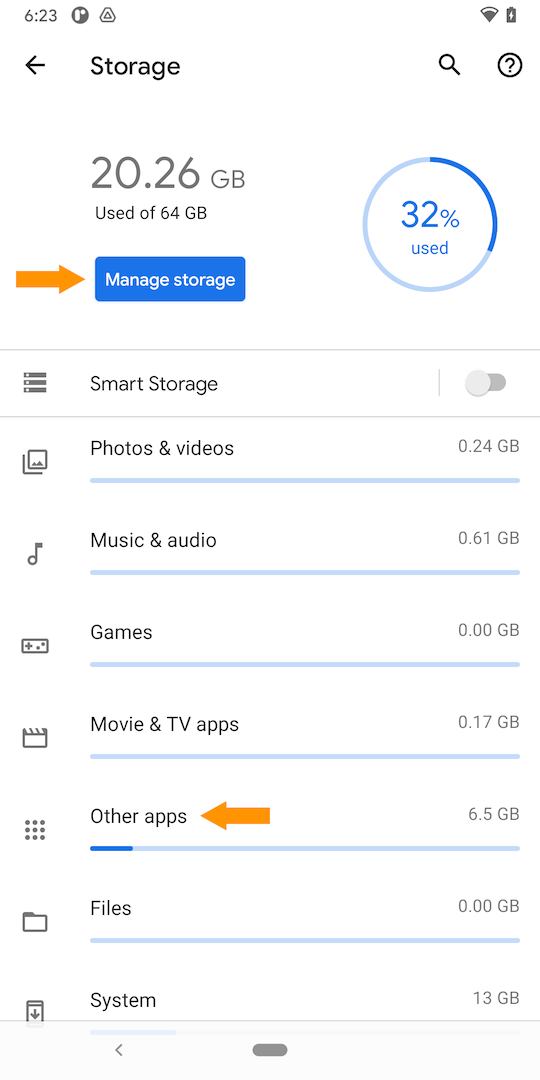
If the process of copying your Cubasis data to the new location fails, insufficient free disk space is the most probable cause. Cubasis requires as much additional disk space as the legacy Cubasis 3 folder takes up (at least until copying succeeds and you delete it manually). To free additional disk space, open the Android Settings app and go to Storage. The exact wording and layout of this Settings page may vary depending on the device manufacturer. The “Manage storage” button offers several options to clean up and make more space. Tapping “Other apps” shows you a list of apps and the amount of storage they require, helping you to decide if there are any memory hungry apps that you no longer need. Likewise, the other categories allow you to view and delete files that take up a considerable amount of disk space. Once you’re done, launch Cubasis 3 again to restart the process of copying from the old to the new storage location.
Should the process of copying your Cubasis data fail multiple times, an additional option appears which is called: “Abort - I am aware of the consequences and will import the existing data through the MediaBay”. If you enable it, Cubasis will no longer show the “Cubasis Data Location Change” dialog at launch, which means that you can continue to work with Cubasis, but your MediaBay might be empty. There are two ways to manually copy your old Cubasis 3 data into the MediaBay now. Either use the Import button in the MediaBay to import individual files, or use a file manager app to copy the /Android/Cubasis 3 directory to the new location /Android/data/com.steinberg.cubasis3/files/Cubasis 3.