Inspector
The track inspector allows for advanced track control.
 Introduction
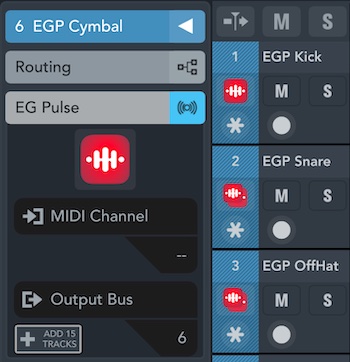
To open the inspector, tap the symbol on the far left of your screen which is colored according to your selected track. To directly access specific options within the inspector, tap any of the handles below.
To change a track's name, tap the top panel displaying it. The arrow symbol on its right hand side hides the inspector.
 Routing (MIDI tracks)
This section offers options for configuring connected MIDI hardware. The following settings are available for both MIDI IN and OUT.
Port selection
- All Inputs / Outputs: The track will send to or receive from any connected device (or app on iOS).
 Audiobus apps: Connects to MIDI devices or apps routed via Audiobus.
- Network session: This option will appear if you are connected to a WiFi network.
To learn how to set up a MIDI via WiFi connection, read here. - External ports: Selecting a specific port will only receive from or send to this device or app.
- MIDI Effect multi-output ports: If a MIDI Effect that has multiple outputs is loaded in any MIDI track, its outputs are listed here also.
Note: On iOS, MIDI from external hardware (e.g. a keyboard) is received by every CoreMIDI compatible app that is running in the background. Cubasis processes (and forwards, see MIDI Thru) the MIDI events it receives, but it cannot control what other apps should (or should not) receive directly from the hardware. It is necessary to configure the MIDI input and output settings in every app depending on the desired routing.
 MIDI Thru
MIDI Thru forwards all incoming MIDI events directly to the specified output device, thereby re-channelizing them to the configured output channel. The following example illustrates a possible MIDI Thru workflow:
- Select an external keyboard as MIDI input port, e.g. on channel 1.
- Select a CoreMIDI compatible background app as output port, e.g. on channel 2.
- Activate MIDI Thru.
- In the background app, set Cubasis as input port and configure a specific sound for channel 2.
- For your current track, set No Instrument in the MediaBay.
- Result: The external keyboard that sends on channel 1 will only trigger the background app on channel 2.
![]() Warning: Using MIDI Thru in combination with Virtual MIDI may lead to feedback loops, as Virtual MIDI blindly connects to all background apps that support this feature. In this event, use the MIDI panic button.
Warning: Using MIDI Thru in combination with Virtual MIDI may lead to feedback loops, as Virtual MIDI blindly connects to all background apps that support this feature. In this event, use the MIDI panic button.
 MIDI panic button
In the rare event of MIDI notes hanging, use the MIDI panic button in the Routing tab to instantly silence all MIDI events triggered within Cubasis and any hardware connected through the MIDI ports.
Channels
- All: Routes all MIDI events from / to this track, regardless of their channel.
- 1-16: Only routes MIDI events with the specified channel number.
 Routing (audio tracks)
Input
Toggle between mono and stereo input mode for connected Audio equipment. If it doesn't support stereo recording, only the Mono option is available.
Additionally, Audiobus is available when turned on.
Note: If Stereo is selected but not available, Cubasis will not record on the track.
Multiple audio outputs
MIDI and audio tracks can be assigned to up to 24 individual outputs (12 stereo pairs) simultaneously. The number of available outputs depends on capability of the connected audio hardware. If no audio interface is connected, only 2 output channels (stereo pair 1/2) are available.
To assign specific outputs, tap the Output panel (showing Stereo Out by default) in the Routing section and toggle stereo outputs via the buttons in the output popup. This popup window can also be called up by tapping the output display in the channel in the mixer.
Note:- If multiple outputs are assigned to a single track, the output panel will display a plus sign, for example "1/2+".
- Only the master channel (= the stereo output 1/2) has insert effects.
- The send effects only route to the master channel.
 Instrument
This panel displays the name of the selected MIDI track's instrument. Tapping it brings up the instrument rack.
If an Audio Unit instrument with multiple outputs is selected, the panel expands and reveals options for MIDI channel selection, output bus selection, and a button to automatically add as many tracks as the instrument has outputs. You can find more details in the Audio Units chapter.
 Insert effects
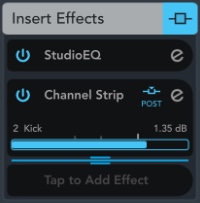
The insert effects section allows to add up to eight insert effects independently for each track. By default, a parametric equalizer with 4 bands for each channel is assigned to each track as well as the multifunctional Channel Strip effect suite.
The order of the effects can be rearranged by tapping, holding and moving an effect vertically.
The blue pre/post-fader line defines which effects are applied pre (above the line) and post (below the line) the track’s volume and pan faders. The line can be dragged by moving its handle.
If side-chaining is enabled for an effect, its slot expands and shows the side-chaining source track, a gain slider to adjust the side-chain input signal gain, and a pre/post icon which can be tapped to toggle if the source track's signal should be taken before or after applying the track’s volume.

 Send effects
There are 8 global send effect buses which all tracks have access to. The level in which send effects are applied to a track can be adjusted for each track individually.
A section's color indicates the current status of its effects:
- Light blue when effects are active
- Dark gray when effects are present but inactive
- Light gray when no effects are present
Learn about adding effects here.
 MIDI effects
MIDI effects can be added to instrument tracks, generating MIDI patterns. Depending on the effect and your settings, they are generated
- based on your keyboard input (e.g. arpeggiators),
- based on the notes in a MIDI event,
- or based on their internal programming (e.g. step sequencers)
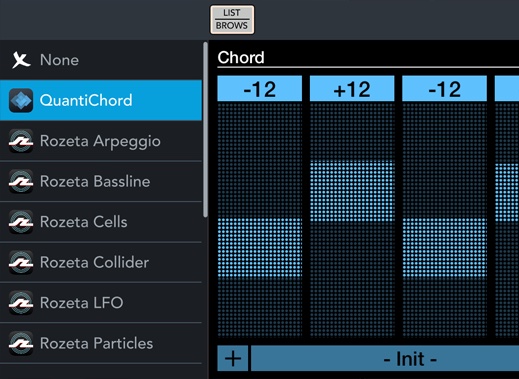
Learn how to use MIDI effects in the MIDI Effects chapter.
 Automation
This section lists all recorded automations.
- Tap the e button next to a parameter to open the Automation Editor.
- Use the On / Off button to toggle existing automation.

The icon's color indicates the current automation mode:
- Red when the track is in write mode
- Green when the track is in read mode
- Dark gray if automation exists but is not read
- Light gray if no automation exists
 Notepad
Notepad allows you to enter notes about the track, song lyrics or other information. Tapping the empty space in the notepad inspector section opens the notepad rack view, where you can enter, paste or view text. In addition, the notepad rack has two buttons to increase or decrease the text size.
 Channel
Displays your selected track's channel as it appears in the mixer. The following controls are available:
 Pan fader: Slide horizontally to adjust your track's stereo pan.
 Volume fader:
Slide the volume fader vertically to set the track's gain. The volume levels during playback or recording are visually shown on its right hand indicator. The display at the bottom of the channel shows the fader's value in
decibels (negative values mean a decrease in volume).
Note: The pan and volume faders' value can be reset by double tapping them.
Volume fader:
Slide the volume fader vertically to set the track's gain. The volume levels during playback or recording are visually shown on its right hand indicator. The display at the bottom of the channel shows the fader's value in
decibels (negative values mean a decrease in volume).
Note: The pan and volume faders' value can be reset by double tapping them.-
 Mute: Use this button to toggle whether the channel's track is muted and therefore excluded from playback.
  Solo: Soloing a track (or a group of tracks) excludes all the other tracks from playback.
  Read: When enabled, all automation data on this track is read and applied during playback.
 Write: Activate this button to record automation data live during playback / recording. More information on automation can be found here.
  Monitoring (audio tracks only): Monitoring outputs the audio input of your track routed through the track's effects.
Note: In order to prevent feedback, monitoring only works if hardware (e.g. headphones, a microphone or an audio interface) is connected.
Monitoring (audio tracks only): Monitoring outputs the audio input of your track routed through the track's effects.
Note: In order to prevent feedback, monitoring only works if hardware (e.g. headphones, a microphone or an audio interface) is connected. Setting a track to Record Enable lets Cubasis know that you wish to record on this track. You can have multiple tracks Record Enabled at a time, which allows for recording on multiple tracks simultaneously.
 Color
Color
If a track but no events are selected, tapping a color changes the selected track's color. If events are selected, it changes the event's colors independently of the track.
System info

- CPU: Shows the total CPU usage of all of the device's CPU cores in real-time, used by all apps and the operating system.
- DSP: Measures the time duration that an audio render cycle takes, divided by the buffer duration (the time available to perform rendering). Factors that negatively impact the DSP usage are low latency, the number and sophistication of instrument and effect plug-ins, the number of of simultaneous notes and events, high instrument polyphony, and other apps running in the background.
With Multi-core Processing disabled, rendering is performed on the system’s single ultra high priority audio thread, which means that a DSP peak of 100% always results in a drop-out (crackling).
When Multi-core Processing is enabled, rendering is performed in engine threads and a short peak of 100% doesn’t always mean that there is a drop-out, because the engine's buffers might have been able to absorb it. A dropout will only occur if DSP is 100% for a longer duration than the extra guard buffer can fit.