Setup
The setup menu holds various options for customizing your workflow.
 Project
- Sample Rate


- Your project's sample rate can be set to 44.1, 48 or 96 kHz. New projects have the recommended default values of 48 kHz (or 44.1 kHz if supported by your iOS device).
Increasing this value only makes sense if an audio device is connected that supports the higher sample rate.
When you switch the project's sample rate or import an audio file which is not in the project's sample rate, Cubasis prompts you to convert the audio file(s). It is highly recommended to go forward with the conversion because it results in better quality and lower CPU consumption. However, if you must continue working and cannot wait for the conversion (which can take up to a few minutes depending on the audio file length), you can skip it. Cubasis will convert the files during playback in real-time, resulting in reduced quality and higher CPU consumption. Note:- Higher sample rates / bit depths result in larger file sizes and considerably higher CPU consumption which can lead to stuttering during playback! For common projects we recommend using 44.1 or 48 kHz at 24 bit.
- Mixdown is rendered to a WAV file with the project's sample rate and bit depth.
- Different device models support different sample rates. Some devices only support 48 kHz, unless external hardware is connected. 96 kHz is only available if audio hardware that supports this sample rate is connected.
- Bit Resolution
- This setting only affects audio recordings and mixdown. Possible bit depth values are 16, 24 and 32 bit. Increasing this value only makes sense if an audio device is connected that supports the higher bit rate, or if you wish to create a mixdown with a higher amplitude resolution. Tapping the Default button makes the selected bit depth the default value for new project. The button is highlighted whenever the default value is selected.
- Undo History Size
- The size of the available undo history can be configured, from 50 to 500 steps. Once the undo history reaches the selected size, the oldest undo step will be discarded with each new editing action.
The Clear History button immediately deletes the whole undo history of the current project and of the audio editor (which has its own undo system). Beware of data loss, because deleting the undo history might result in the loss of original audio or MIDI recordings (if they were edited and only available via undo). - Share Undo History
- When sharing a project via the MediaBay’s Share button, a zip file containing the project’s .cbp and audio files is created. If this setup option is enabled, the (hidden) undo history file is also included in the zip file.
- Physical Inputs/Outputs
- Cubasis supports 24 inputs and 24 outputs by default. The optional 64/64 beta feature option lets you extend the number of physical inputs and outputs to 64 channels at your own risk.
 Arranger
- Arm Selected Track
- If enabled, selecting a track will automatically enable recording on it and vice versa. Manually armed tracks will not be influenced by this.
- Keyboard Shortcuts
- Connect any Bluetooth or cable keyboard to your device or use a keyboard cover for your tablet. Choose between the default (mobile optimized) or the more traditional Cubase preset. Tap the "Open List" button to display a multi-page list of all the possible keyboard shortcuts. On iOS, hold down the command key for a few seconds to display a handy overlay that lists the most important shortcuts.The following table lists the default shortcuts and their corresponding actions:
Keyboard Shortcut Action Esc, ^ or back button Close view Enter Open MIDI or audio editor Shift + H Open Hub Alt + L Toggle MIDI learn mode Space Play / Pause R Record L Cycle C Metronome , Rewind. Hold the Alt (Option) key for reeling. . Forward. Hold the Alt (Option) key for reeling. P Locators to event selection - and +, or g and h Zoom horizontally in and out. Hold Shift for vertical zoom. ↑ and ↓ Previous / next track, or select the event or note above / below. Hold Shift to multi-select. ← and → Previous / next event or note. Hold Shift to multi-select. Cmd (or Ctrl) + N New MIDI track. Add Alt for new audio track. Add Shift for new group track. Cmd (or Ctrl) + A Select all events of a track. Press again to select all events on all tracks. Cmd (or Ctrl) + Z Undo. Hold Shift for Redo. Cmd (or Ctrl) + C Copy Cmd (or Ctrl) + V Paste Cmd (or Ctrl) + X Cut Cmd (or Ctrl) + S Split Cmd (or Ctrl) + G Glue Q Quantize S Solo the track. Hold Shift to solo all tracks. M Mute the track. Hold Shift to mute all tracks. D Duplicate track Backspace Delete the event or note. Hold Cmd (or Ctrl) to delete the track. - Return To Start Position On Stop
- When playback is stopped, the playhead jumps back to the position it originally started at.
- Playhead Scrubbing
- If enabled, moving the playhead (by sliding on the ruler) will play a short snippet of the song at the playhead’s position.
- Low Waveform Quality
- If enabled, audio events in the track list are displayed with a lower detail level, which reduces the CPU and disk load. If you experience stuttering during playback or scrolling, enable this setting.
User Interface
- Background Color
- Choose between a bright, grey and dark background color on the arranger.
- Screen Mode
- Allows to choose a preset to change the size and arrangement of the Cubasis user interface.
- Mixer Level Meters
- In the mixer, or in the Inspector’s channel view, the level meters also have a small bold line that indicates level peaks. This setup option allows you to configure if you would like these peak lines to smoothly start falling right away, or if they should hold any maximum peak value for 1 second, or if they should the all-time maximum value forever (until touched). Tapping a level meter resets all the channel’s peaks and red clipping lights.
- Show Zoom Panel

- Toggles the zoom panel in the bottom right corner of the arranger and the editors. Use the panel's arrow buttons to choose between horizontal and vertical zoom, and the slider to quickly set the zoom level in steps.
- Long-Tap Sets Locators to Event
- This option is enabled by default, which means that long-tapping an event on a track snaps the left and right locators to it. But you might want to turn this feature off if it gets in the way of your way to edit tracks and events.
- Show Grid on Top of Events
- The grid lines can either be drawn behind or on top of events in the track list.
- Show Status Bar
- Available on iPad only. Toggles the iPadOS status bar that displays the time, battery status and other info icons. When using Stage Manager (introduced with iPadOS 16), it is strongly recommended to enable the status bar because otherwise, Stage Manager’s center “…” button covers the play and cycle buttons of Cubasis.
- Always Show Track Buttons
- Available on smartphones only. If enabled the delete / add / duplicate buttons will always be visible at the bottom of the screen. If disabled, they can be found at the end of the track list, below the last track.
- Audiobus Panel Position
- Choose your desired location of the audiobus overlay panel (bottom / left / right).
 Audio
Audio
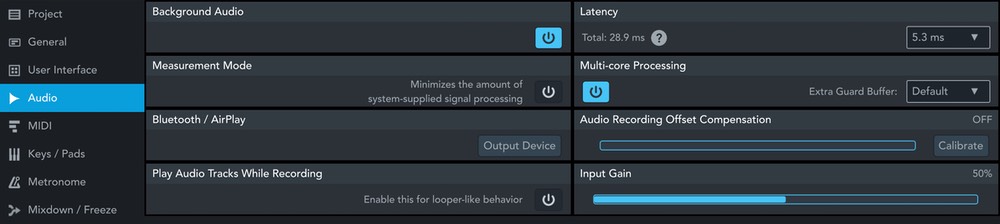
- Background Audio
-
If background audio is switched on, Cubasis playback will continue in the background, even if you press the home button or start another app. Combined with MIDI, background audio provides a set of useful possibilities:
- Play live to a Cubasis backing track with another music app.
- Play live to music coming from another app with Cubasis instruments.
- Press the sleep / wake button to switch off your screen during a long playback.
- Latency
-
The latency value sets the system’s audio buffer length in milliseconds. Possible values range from around 1.3 ms (64 samples at 48 kHz) to 43 ms (2048 samples at 48 kHz), depending on the sample rate. Lower latency values are useful for recording or playing an instrument or vocals live, but negatively impact performance. Select a high latency for best performance when arranging or mixing complex projects, or whenever crackling occurs and the DSP meter (in the Inspector) reaches its maximum.
The question mark button brings up a breakdown of the total I/O latency. This enables you to identify what makes up the largest part of the total latency. Note that on Android, device I/O latency is unknown, only system and guard buffer latencies will be displayed. Note: As this is an iOS wide setting that applies to all apps, only the first audio app you have launched is permitted to change it. If altering the latency in Cubasis is impossible, another audio app is blocking access. This can be solved by either using the other app to change the latency or by quitting all apps and launching Cubasis first. Note: On Android, higher latency values (64ms and more) may improve the device's internal speaker's audio output quality, whereas lower latency values (4ms) may improve audio recording quality. - Multi-core Processing
- In most situations, Cubasis will perform best if audio rendering is distributed over all CPU cores. Multi-core rendering yields the most performance benefit when playing projects with many tracks and effects on devices with many CPU cores. However, it comes with additional latency because an extra “guard buffer” is required for multi-core rendering. Setting the guard buffer to “low” makes it the same length as the system’s audio buffer (which, on iOS, is the value set for “Latency” above). Default is twice the length of the system’s buffer, high is 4x and max is 8x (which is the default on Android).
If you experience crackling noise and high DSP meter levels (in the Inspector), increase this value, but be aware that this also increases the latency between input (e.g. pressing a keyboard key, or audio monitoring) and audio output.
Note: In certain rare situations (on some Android devices, or when using certain multi-output AU instruments iOS), disabling Multi-core Processing might result in better performance, but in most cases it is strongly recommended to leave this setting on. - Measurement Mode
On iOS, enabling this mode minimizes all input and output signal processing that is normally applied by iOS. This can significantly reduce the output volume and the gain of audio recordings. Use it only if you are certain that you require unprocessed, raw audio I/O.
- Sample Rate Conversion

On Android, this setting maximizes the quality of Android’s automatic sample rate conversion in the case that audio hardware with a sample rate different to the device’s is connected. It also minimizes all input signal processing that is normally applied by Android. Use it only if you are certain that sample rate conversion is required, that the default quality is insufficient for your needs, and that your device’s CPU is powerful enough to handle the increased workload.
- Audio Recording Offset Compensation
- The I/O loopback latency inherent in every system leads to audio recordings being out of sync with the metronome on the track.
If this value is set to the exact loopback latency of your device (and external hardware setup), audio recordings will be in sync without the need of manually nudging recorded audio events to the right position.
Tap the Calibrate button and follow the instructions to automatically set this value. For the calibration to work, the audio input device must “hear” the audio output device. Either connect nothing at all, or when using an audio interface, connect speakers and a microphone so that the speaker output is picked up by the microphone.
Note that when you change the Latency or Guard Buffer settings on this setup page, or when dis/connecting an audio interface, this value must be re-calibrated. - Bluetooth / AirPlay
-
Tap the “Output Device” button to open a list of outputs that are available to iOS.
- Both services operate with fairly high latency.
- Bluetooth: Make sure you have turned on Bluetooth in your device settings and paired your device with a Bluetooth accessory (headphones / speakers).
- Play audio tracks while recording
If enabled, existing audio events on a track are audible while recording or monitoring on the track.
By default, this setting is disabled which means that audio events on this track won't be played if monitoring is enabled of if the track is being recorded on.- Input Gain
Adjust the input gain scale with this slider if the recorded audio material is too quiet or if clipping occurs although the track's volume is set to 0dB or less. On iOS, the input gain slider is only enabled if an audio device that supports input gain scaling is connected (some devices also support internal microphone gain adjustment).
- Input & Output Devices
A list of all possible output devices to receive / send audio from / to.
 MIDI
MIDI
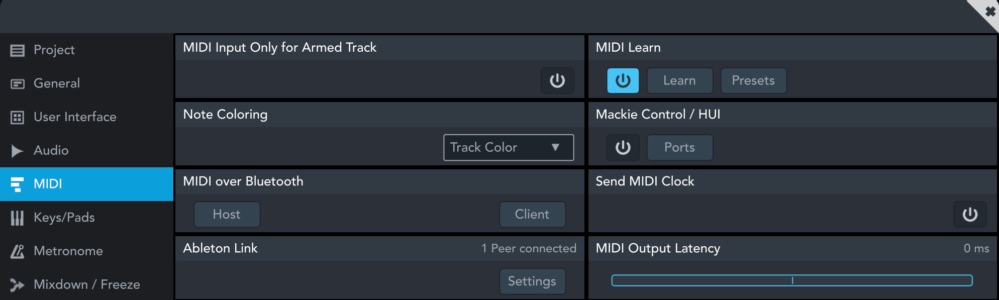
- MIDI input Only for Armed Track
- If turned on, this option limits MIDI input signals to record-enabled tracks only, e.g. if you are playing on an external keyboard, it will only be registered if its corresponding track has recording enabled.
- Note Coloring
- Choose which coloring scheme is applied to notes in the Key Editor: Track color, velocity value or key.
- MIDI over Bluetooth
- The MIDI over Bluetooth LE (low energy) functionality lets Cubasis send or receive MIDI data to or from other Bluetooth-enabled devices. The following combinations are possible:
- iOS device → iOS device
- iOS device ↔ Mac
- Compatible MIDI hardware ↔ iOS device
To set up a connection, first make sure that Bluetooth is turned on in the device's settings.
There are two ways to connect with another MIDI device:
- Host mode will open a selection window showing discoverable devices. Once paired with a client, the paired device will become selectable as MIDI input / output in the Inspector's Routing section. Best used when utilizing Cubasis as central DAW with MIDI hardware or a second iOS device as client.
- As Client, turning on Advertise MIDI Service makes your iOS device visible to other devices seeking a connection. Once you've confirmed the host device's pairing request and a connection is established, select the host device as MIDI input / output in the Inspector's Routing section. Best used when connecting to a second host iOS device or Mac.
- Ableton Link
-
Link is a technology that keeps devices in time over a local network. It provides tempo and beat synchronization between multiple devices, or between multiple apps running on the same device. More information and a list of supported mobile apps, desktop apps and hardware can be found here.
To sync via Link, turn on WiFi and Bluetooth on all devices, enable the Ableton Link option on all devices, and optionally enable start/stop sync.
Note: Link does not sync the absolute song position, but it syncs the beat position inside a bar. For example, one device could be at bar.beat position 1.3.3 and another device at 99.3.3. Note: On Android there is an additional latency slider, because an Android app cannot know the device’s I/O latencies (that stem from the DAC, mic, speaker etc.). Recommended practice is to enable Link, start metronome playback on both devices, and adjust the slider until the metronome ticks match. Note: Ableton Link is not available on Chrome OS. Note: When using Inter-App Audio, it is recommended to disable Ableton Link for most other apps. IAA has its own sync mechanism (which most apps support), enabling Ableton Link might cause sync issues because these two sync mechanisms might interfere with each other. - MIDI Learn
-
MIDI learn allows you to map any hardware button, knob, fader or other control that sends MIDI CC or MIDI note messages, to a button, knob or fader in Cubasis. This is useful if your MIDI controller doesn’t support the Mackie Control or HUI protocols (also sometimes called DAW mode), in order to create a custom mapping.

First off, make sure that your MIDI controller is in MIDI mode, CC mode, or sometimes called CTRL mode. If it’s in Mackie, HUI or DAW mode, it cannot be used for MIDI learn, but for Mackie control (see the next chapter).
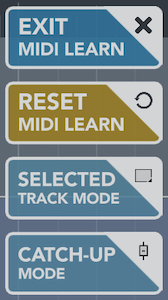
To start mapping your controls, simply tap the Learn button (or press Alt + L on your keyboard) to enable learn mode. This will automatically enable MIDI Learn and create a new user preset if you had not created one yet. In learn mode, all Cubasis controls that can be assigned get a green overlay. There are even some additional overlays in the track list that map the action of selecting the previous or next track (see the green arrow buttons in the screenshot). Tap a green overlay (e.g. a volume fader) and it will turn red. Move a hardware control (e.g. a fader) to create a mapping. The overlay will turn orange and the MIDI key or CC value will be displayed. Tap the X icon to delete the mapping. All mappings are automatically saved in the currently selected user preset. In Learn mode, four global buttons are displayed in the upper right corner:
- Exit deactivates MIDI-Learn mode.
- Reset clears all mappings in the selected user preset. Be careful, this cannot be undone and the preset will be empty.
- Selected Track Mode will only show overlays on the selected track in the track list and the mixer. When you assign a control in this mode, it will always control the selected track. This is useful with controllers that have only one fader and knob, to always control the selected track’s volume and pan, for example. It can even be used to control the selected track’s effects (like StudioEQ) and instruments (like Micrologue). With selected track mode disabled, the assignments are made for a specific track number, for example volume of track number 7.
- Catch-Up Mode is only available for volume and pan. Imagine that you select a track that has its volume at 0dB in Cubasis, but your hardware MIDI controller’s fader is currently at its min position. When you start moving the fader up, the track’s volume will immediately jump to a very low volume value like -100dB. To prevent this, enable catch-up mode before assigning the mapping. This means that the track’s volume won’t change until the hardware fader’s value will match (or catch up to) the track’s volume, which is 0dB in our case. This will result in a smooth volume change from the moment your hardware fader reaches its 0dB position.
Note: Controls of a MIDI device that has been declared a Mackie or HUI port cannot be used for MIDI learn. Make sure to deselect the Mackie or HUI tags in the Mackie Ports popup first.
Note: On Android, port selection is not available yet, which means that it’s not possible to use multiple MIDI controllers at the same time for MIDI learn.Note: The instrument preset browsing arrows cannot be mapped for a specific track. In this special case, MIDI control always applies to the selected track.
Note: Cubasis only processes MIDI CC and MIDI note on/off messages for MIDI control. SysEx messages are ignored.
Note: If MIDI CC is mapped to a button or a switch, a value in the range 64-127 will toggle it.
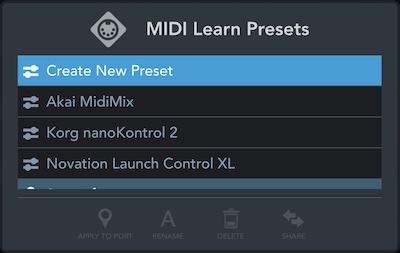
The Presets button brings up the list of presets. The top entry lets you create a new user preset. Below it, factory presets are listed first, and user presets are listed below. There is an important distinction:
- A factory preset contains a ready-to-use mapping for one specific MIDI controller. Double tapping a factory preset opens a list of MIDI input ports, because it must be mapped to a MIDI port. You have the option to either Create a new user preset from the factory preset, or to Merge it with the currently selected user preset. Imagine that you have 2 MIDI controllers connected, in which case you would want to map each one’s preset to its port, by merging them into one user preset.
- A user preset contains mappings to specific ports, which means that it could contain mappings to multiple MIDI controllers that are connected at the same time. For example, CC42 of MIDI controller A could be mapped to volume, while CC42 of MIDI controller B could be mapped to pan at the same time. However, port IDs are device specific and cannot be automatically matched to the ports of another tablet or smartphone. So, if you use the Share button to copy your preset (.cml file) to another device, make sure to tap the Apply to Port button on the other device to apply your user preset to one MIDI port. Mappings that are done in Learn mode are automatically saved in the currently selected user preset.
- Mackie Control / HUI
-
Many hardware MIDI controllers support the widely used Mackie “MCU” protocol, or its predecessor, the HUI protocol. In this case, doing MIDI learn manually is not necessary, since the Mackie protocol goes beyond MIDI learn by also sending MIDI output to the controller, like fader position for motor faders, or track information for controller displays.
To start off, read your controller’s user manual and set it to Mackie mode, HUI mode, or also sometimes called DAW mode. If there are multiple Mackie modes to choose from, select the Mackie Cubase mode.
Tap the Ports button in the Cubasis MIDI setup and tap both the input and the output port of your MIDI controller once, which will set them to Mackie mode. To switch to HUI mode, tap the ports again. Tap them a third time to disable Mackie control, thereby making the controller available for MIDI learn.
If you have a device with more than 8 faders, it probably has multiple MIDI ports. In that case, tap the first input and output ports to declare them as Mackie. Then tap the second pair of ports, which will declare them as “Mackie 9-16”, thereby changing the first ports to “Mackie 1-8”, which refers to the track numbers of course. The bank buttons can be used to move all faders 8 tracks left or right.
Note: Not all features of the Mackie and HUI protocols are supported by Cubasis yet. Let us know on the forum if you’re missing a specific control, as we are looking to improve Mackie control support in future updates.
Note: On Android, port selection is not available yet, which means that it’s not possible to use multiple Mackie or HUI controllers at the same time. Also, MIDI learn and Mackie Control cannot be used at the same time on Android yet. - Send MIDI Clock
-
If MIDI clock is activated, the following signals are sent to all the connected MIDI devices and background apps:
- MIDI clock is sent continuously during playback.
- MIDI start, continue and stop messages are sent when playback is toggled.
- The MIDI song position pointer is sent when the playhead is positioned.
- MIDI clock can only be used to synchronize MIDI data, not digital audio.
- Cubasis does not support receiving MIDI clock parameters from other devices.
- MIDI Output Latency
-
Depending on the audio app or external device you have synced with Cubasis via MIDI clock, you might notice an offset between both devices. Use the output latency fader to compensate for this offset. Positive values (up to 100ms) will delay any outgoing MIDI events. Negative values (down to -100ms) will add latency to Cubasis' audio output so that MIDI events are sent earlier than the internal audio output.
- Enable MIDI I/O
-
This setup option is only visible on Android 13, where a bug prevents audio input and output with USB hardware that features both audio and MIDI ports. As a temporary workaround until Android 13 is fixed, disabling MIDI I/O will fix audio I/O. Be sure to restart Cubasis and unplug and plug your USB device in again, after changing this setting.
 Keys / Pads
- Dark Keyboard
- Choose between a bright or dark keyboard appearance.
- White Keys Touchable Between Black Keys
- This allows white keys to be touched in the area between the black keys. Turn this mode off to make touches in the upper area apply to the nearest black key (which allows for easier playing on black keys / swiping).
- Velocity Sensitive
- When enabled, Cubasis detects note velocity upon touch of a key or pad. Keys are loudest when touched at the bottom; Pads attain the highest velocity at the center.
- Transpose
- Transposition shifts notes that are played on the keyboard or received via MIDI input up or down, to a maximum of +/- 24 semitones (2 octaves).
- Label All Keys
- Enable this setting to show labels for all keyboard keys (C to B) instead of just the C.
 Metronome
- Volume / Pan
- Volume and pan are applied to all metronome clicks, even to precount (which is still active even when you have turned the metronome off).
- Precount Mode
- Sets how many bars the metronome will count in before recording actually starts.
- Metronome Only During Recording
- If this option is enabled, the metronome will not be audible unless you are recording.
- Sound
- Choose between 10 different metronome sounds.
 Mixdown / Freeze
- Real-time Mixdown and Freeze
- Using real-time mixdown helps inter-app routing to stay stable during mixdown and improves the accuracy and timing of your rendered song.
- Unfreeze Deletes Audio Track
- Normally, the clone track is deleted when you unfreeze a track. Disable this setting to keep the clone track. This can also be handy for creating a quick mixdown of just one track by freezing and immediately unfreezing it.
- FLAC Compression Level
- The FLAC compression levels range from 0 (fast decoding, large file size) to 8 (slow decoding, small file size). They do not have any impact on quality, as the exported files are lossless representations of the original audio data.
- M4A Bitrate
- The bit rate determines the quality of a mixdown in mp3 or m4a format. The higher the bitrate, the higher the quality and file size, respectively.
- Track Freeze Uses Mixdown Settings
- Allows to apply the mixdown settings such as "Normalize" or "Mixdown between locators" to track freeze. In addition, the Settings button enables the direct access to the mixdown settings.