Global Tracks
Global tracks can be used to control different aspects of the overall project, like tempo and time signature changes. To add the global track section on top of the track list, tap the “Add” button, then tap “Global”. The global section can be visually toggled via the small arrow button at the top. Each track can be enabled or disabled by the on/off button next to it. The tempo track also has an additional button that maximizes its height, to make editing easier.
To delete a global track, select it and tap the “Delete” button. The global track section will disappear if there are no more global tracks.
Tempo Track
You can use the tempo track to create tempo changes within a project, which are displayed as points and lines on top of the track list. While MIDI tracks always follow the tempo track, audio events need auto-stretch enabled in order to follow any tempo changes. The ruler always shows musical timing, which means that it doesn’t stretch and stays constants, regardless of the tempo track’s content.Note: There is always one tempo point at the beginning of the song, which can be changed, but not deleted. Note: On iOS, a latency of at least 5.3ms is recommended when using a tempo track, in order to avoid timing issues. Note: Using a tempo track disables playhead scrubbing and Ableton Link. There are two ways to add and edit tempo points:
Editing in the Track List
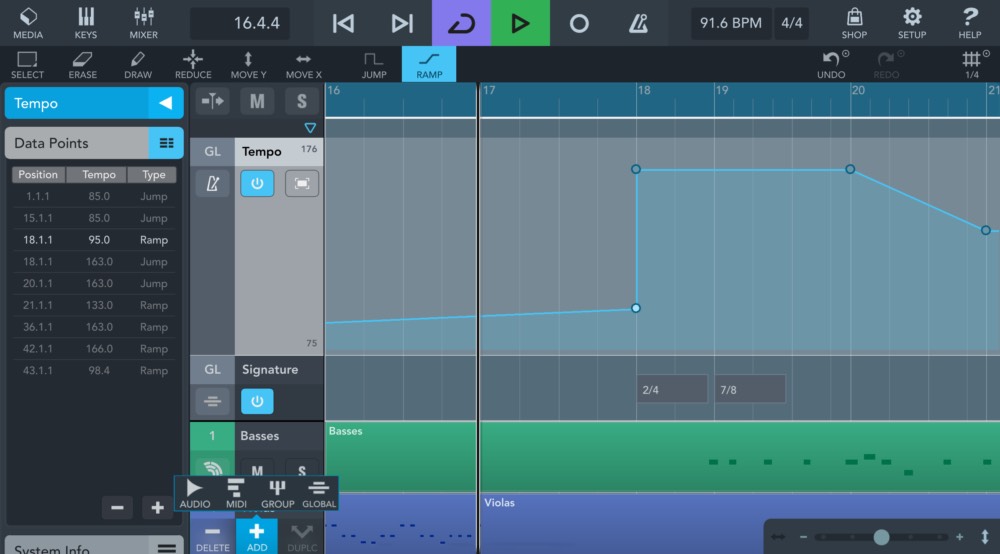
The two gray numbers on the left side of the tempo track indicate the visible tempo range in bpm. Sliding vertically on the tempo track scrolls the view, whereas pinching zooms in our out, both horizontally and vertically. You can use the following tools on the tempo track: Select: To select a single point, tap it. Selecting multiple points is done by tapping the Select button and dragging out a rectangle touching the points you want to select. Note: Double tap inside the editor to select all points.
 Erase: Deletes all selected automation points.
  Draw: Allows you to draw custom automation curves and overwrite existing automation data. The point density corresponds to the selected grid size in the tools menu.
 Reduce: Reduces the point density of the current selection. Tap the Reduce button multiple times to reduce the curve down to the most relevant points. Note: To reduce CPU load and make editing easier, it is recommended to reduce the amount of points to the needed minimum after automation recording.
 Move vertically: Selected points can only be moved vertically.
 Move horizontally: Selected points can only be moved horizontally.
Note: You can move points freely in all directions by selecting and dragging them. Jump: Changes the selected points to be discrete jumps (steps) from one value to the next.
 Ramp: Changes the selected points to be linear ramps, to create ritardandos or accelerandos.
Note: In draw mode, the jump and ramp buttons define which type of point is drawn next.
Editing in the Inspector
If the tempo track is selected, the Inspector displays a list of all tempo points. Use the plus and minus buttons below the list to add a new point at the position of the playhead, or to delete the selected points, respectively.Tap a point’s position or tempo to open a popup to edit the value. Then either tap the value to enter a new number via the keyboard, or tap or hold the +/- buttons, or tap and slide on the value to change it. Tap a point’s type to toggle all selected points between being a jump or a ramp.
Signature Track
You can use the signature track to add and edit time signature events within a project, which are displayed as small rectangles on top of the track list. Similarly to the tempo track, these signature events can be added, edited or deleted via the track list or the Inspector (more details in the previous chapter), with a few limitations:- A signature event cannot be moved directly in the track list, but by tapping its position in the Inspector’s list.
- Signature events can only be placed on bars.
- Two signature events cannot occupy the same position (bar).
- Only one signature point can be drawn at a time.
- A signature’s numerator can range from 1 to 64, whereas the denominator can be any power of 2 up to 64.