MiniSampler 
The MiniSampler not only offers a series of factory presets, but it enables you to create custom instruments. It can also load custom instruments (.cbi files) that were created with MiniSampler in earlier versions of Cubasis.
Note: For percussion instruments, the three HiHat keys F#1, G#1 and A#1 (according to the General MIDI standard) comprise a mute group, which means that triggering one of these notes will stop the others.
Basic Control Window
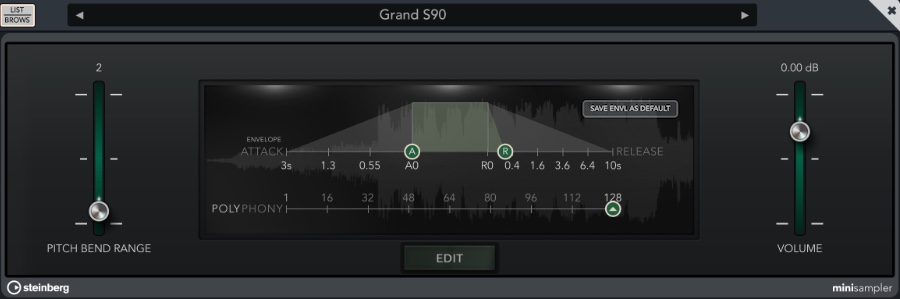
- Pitch Bend Range: Adjusts the pitch bend range of your instrument in semitones (1 - 12). Note: When exporting to MIDI, Cubasis doesn't write the pitch bend range to MIDI files. It must be set manually in the app that you import the MIDI file into.
- Volume: Adjusts your instrument's volume in dB.
- Attack / Release: As in Micro Sonic, adjust your instrument's attack (A) and release (R) values by sliding the controls horizontally. Note: The attack and release values cannot be automated.
- Save Envelope as Default: Applies the current attack / release values to your instrument every time it is loaded on a MIDI track. This button is only visible for user instruments, not for factory instruments.
- Polyphony Defines the maximum number of notes that the track plays back simultaneously. This limit is set to ensure smooth performance. Having a high polyphony with lots of effects might cause playback stuttering and clipping, while a low polyphony causes certain notes to end too soon. If the number of notes played exceeds the polyphony parameter, the notes triggered the longest way back are faded out, making space for new ones. The value can be set from 1 (where every note stops the previous one) up to 128 voices.
- Edit: Opens the MiniSampler editor.
Recording Samples
- Select the Record tab in the left column and choose your desired input device.
 When using headphones, enabling monitoring can be handy.
-
On the keyboard below, select a key you'd like to record your sample for. It will be highlighted in red.
To set the position of your keyboard, drag the light area or the triangles in the miniature keyboard. Sliding the left or right marker changes the keyboard's range.  When you're all set, hit the Record Button. Press it again to stop recording.

A new wave file has now been created in the Audio / My Samples folder in the MediaBay. To repeat the process, simply select a different key.
Importing Samples
- Select the Import tab in the left column.
- Navigate to your desired directory.
- Drag an audio file of your choice to the desired key on the keyboard, or double tap it to assign it to the selected (red) key.
Arranging Samples
Each sample is assigned to a root key (colored) that plays the sample with its original pitch. All keys within the colored range will be pitched accordingly (keys below the root key will have a lower pitch and vice versa).
- To set the lowest or highest key, grab the left or right edge of the range and drag it.
- To move the root key (including the whole range), tap and hold the sample's range, then drag it horizontally.
- Double tap the left or right edge of a range to extend it as far as possible (until the next range or the lowest or highest key).
To select a sample for editing, simply tap its root key on the keyboard (tapping any other key will leave the editing view unchanged).
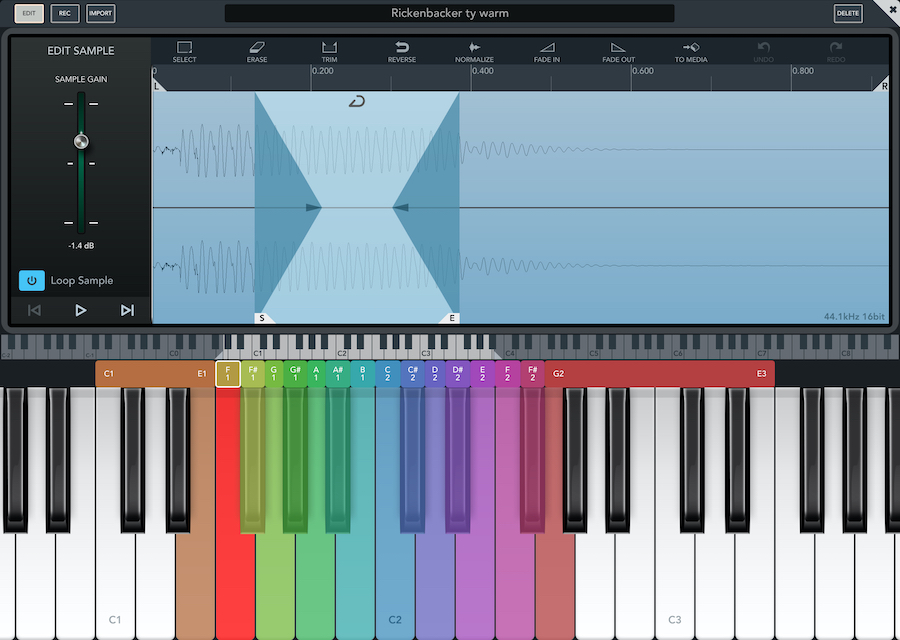
Editing Samples
Tap the Edit tab to the left and you will find a sample editor similar to the one used for editing Audio Events.
Use horizontal swiping and pinching gestures to move your view or to zoom it in and out.
The editor will always show the sample of the last pressed root key.
The following tools are available:
 Select: By default, the area between the two selection locators is always selected. Tap the
Select option to select the whole area you are currently viewing.
Any of the processing tools below apply to the selected area.
Select: By default, the area between the two selection locators is always selected. Tap the
Select option to select the whole area you are currently viewing.
Any of the processing tools below apply to the selected area. Trim: Erases all audio material around your selection.
 Erase: Erases all selected material.
 Reverse: Reverses the selected part of your sample, which makes it sound backwards when played.
 Normalize: Normalizing a file will change its general volume by setting the peaks to 100% without clipping. If a quiet waveform has no high peaks, normalizing it increases its overall gain (volume) until its highest levels have reached their maximum.
 Fade: Fades your selection in or out.
 Save to Media: Saves the currently selected sample as a wave file in the
MediaBay Audio directory.
Save to Media: Saves the currently selected sample as a wave file in the
MediaBay Audio directory.
On the left hand side:
- Loop Sample: Enables a loop range within your sample. Upon entering that range, your sample will infinitely loop between the start (S) and end (E) marker until released. Move either marker to extend or shorten the loop range. Drag the loop icon at the top to move the whole range. Slide horizontally across the cross-fade envelopes to adjust their length.
- Sample Gain: Adjusts your sample's volume level.
File Management
Note: MiniSampler instruments are saved globally. Changes made to an instrument will affect all projects this instrument is used in!- To rename a sample, tap its base key on the keyboard, then tap its name at the top of the editor screen to rename it.
-
 The Delete button to the right of the name will remove the sample from your custom instrument's keyboard. The original audio file will remain in the MediaBay.
 - Deleted instruments can be recovered from the trash folder.